TrendyMag
Magazine and Blog WordPress Theme
- created: 09/08/2017
- latest update: 09/08/2017
- by: Trendy Theme
- trendytheme.net/
- email: trendytheme.net@gmail.com
Thank you for purchasing TrendyMag Magazine and Blog Wordpress Theme! Before you get started, please be sure to always check out this documentation. We outline all kinds of good information, and provide you with all the details you need to use TrendyMag Wordpress.
TrendyMag can only be used with Wordpress and we assume that you already have Wordpress installed and ready to go. For basic qustaion about wordpress please try to search in google , or read wordpress doucmation
If you are unable to find your answer here in our documentation, we encourage you to contact us through themeforest item support page with your site CPanel (or FTP) and wordpress admin details. We're very happy to help you and you will get reply from us more faster than you expected.
Thank you, we hope you to enjoy using TrendyMag Wordpress Theme!
1. Theme Overview
TrendyMag is a WordPress theme exclusively built for news, newspaper, magazine, publishing or review websites. It is fully responsive, retina ready and easy to customize.
TrendyMag empowers you to build sites under Corporate News, Sports News, Tech News, Food Blogging, Game News and review, Travel Blogging and much more categories. TrendyMag also supports videos from YouTube and Vimeo. It uses the best clean SEO practices, and on top of that, it’s fast, simple, and easy to use. In addition, TrendyMag supports responsive Google Ads and AdSense.
2. Theme Features
- One Click Demo installation(Import full demo in a single click)
- 6 Full News Website Demo
- Boxed and Full width layout.
- Powered by Visual Composer – the best Drag and Drop page builder
- Revolution slider Included
- Extremely easy to setup and configure
- Inline Google AdSense or other ads after a predefined number of paragraphs
- Unlimeted color option. (Choose your favourite color)
- Infinite Layouts (With our shortcodes and visual composer you can build infinite page layout.)
- WPML translation ready.
- Mailchimp supported using MailChimp for WordPress Plugin
- Child theme ready
- Left and right sidebar option
- 10 Unique Blog Layouts
- 3 Unique Footer Styles
- Fully responsive with all devices.
- Retina-ready graphics.
- Cross browser support.
- Attractive CSS animation.
- Google Fonts used: Choose your fonts from over 300+ Google Webfonts
- Extensive documentation (Text and Video)
- Excellent customer support – We care about your site as much as you and will help in anyway possible.
3. Theme Installation
Check our Video Channel for easy installation and setup process.
Downloading theme from Themeforest
If you already downloaded the theme after you first purchased it, you may have a file called something like "themeforest-19655492-trendymag-responsive-news-wordpress-theme.zip". Then extract the zip file, and inside it browse to trendymag.zip. The trendymag.zip file is the WordPress installable file.
Theme Installing and Activating
There is three ways to install theme :
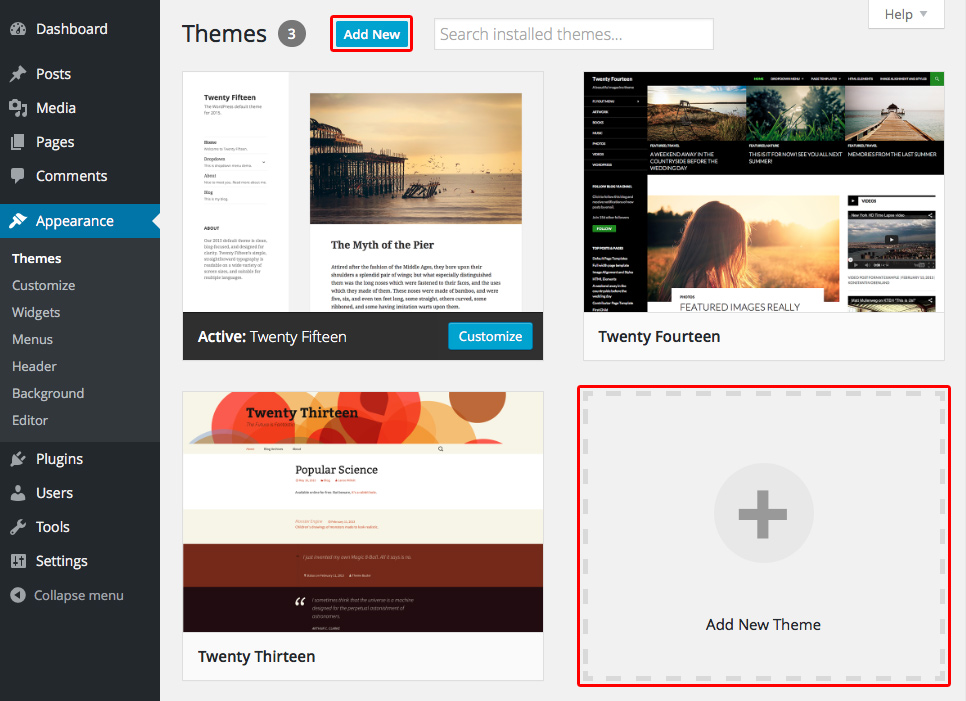
A. Adding New Themes using the Administration Panels:
- Log in to the WordPress Administration Panels.
- Select the Appearance panel, then Themes.
- Select Add New.
- If you've downloaded the installable WordPress file, then you do not need to unzip the file. If you've downloaded the Full Theme Package, you have to unzip the master "themeforest-19655492-trendymag-responsive-news-wordpress-theme.zip" file, you will see trendymag.zip file, this is the one you select to install.
- Click 'Choose File' and select the trendymag.zip file.
- Once the file has uploaded then click activate it, or go to WordPress Dashboard > Appearance > Themes and click the Activate button.
B. Adding New Themes by using cPanel:
If your host offers the cPanel control panel, and the Theme files are in a .zip archive follow these instructions. Note: This assumes the Theme you download is a compressed (.zip) file containing a folder under which all the Theme files reside.
- Download the Theme .zip file to your local machine.
- In cPanel File Manager, navigate to your Themes folder. If your WordPress is installed in the document root folder of your web server you would navigate to "public_html/wp-content/themes" and if you have WordPress installed in a sub-folder called WordPress, you would navigate to "public_html/wordpress/wp-content/themes".
- Once you've navigated to the Themes folder in cPanel File Manager, click on Upload file(s) and upload that .zip file you saved in Step 1.
- Once the .zip file is uploaded, click on the name of that file in cPanel, then in the panel to the right, click on "Extract File Contents", and that .zip file will be uncompressed.
- Follow the Selecting and Active Theme process from bellow.
C. Adding New Themes Manually (FTP):
To add a new Theme to your WordPress installation, follow these basic steps:
- Download the Theme archive and extract the files it contains. You may need to preserve the directory structure in the archive when extracting these files. Follow the guidelines provided by your Theme author.
- Using an FTP client to access your host web server, create a directory to save your Theme in the wp-content/themes directory provided by WordPress. For example, a Theme named Test should be in wp-content/themes/test. Your Theme may provide this directory as part of the archive.
- Upload the Theme files to the new directory on your host server.
- Follow the Selecting and Active Theme process from bellow.
Selecting the Active Theme
To select a Theme for your site:
- Log in to the WordPress Administration Panels.
- Select the Appearance panel, then Themes.
- From the Themes panel, roll over the Theme thumbnail image for the Theme you are interested in to see options for that theme.
- You can view more information about any theme by clicking Theme Details.
- A live preview of any Theme (using your blog's content) can be seen by clicking Live Preview.
- To activate the Theme click the Activate button.
After activating theme make sure to install required and recommended plugins.
Here is the installation video for better understand. Please follow the step for make your site as like as demo.
4. WordPress Upload Limit Problem
By default wordPress allow upload 2MB to 128MB file size from dashboard. For that reason you may encounter "upload_max_filesize" issue when you upload large file.
Editing PHP.ini
You can check them by installing the WordPress phpinfo() plugin and checking Settings. The first column refers to your installation value, and the second column refers to the limits of your host. The latter values are often lower if you have selected a cheaper hosting package.
Best way to increase the file upload size is to make changes to your server's php.ini file.
Depending on your web host, you may be able to edit this php.ini file directly. php.ini file is located typically in a "conf" or "etc" folder in root directory of your server. Search through these folders to find a file labeled "php.ini". Drag this file to somewhere on your local hard drive, and open it up in any text editor.
A snippet from php.ini
First, find the "memory_limit" value, and change this to 256M (unless this is already set to something higher). Next, find the the "post_max_size" and change this to 48M. Finally, find the "upload_max_filesize" and once again change this to 48M. You may also want to find the "max_execution_time" variable and set it to something like 300, "max_input_time" to 600 and "max_input_vars" to 5000. This will ensure that your site does not time out when uploading larger files.
In the end, your values will look like this:
memory_limit=256Mpost_max_size=48M
upload_max_filesize=48M
max_execution_time=300
max_input_time=600
max_input_vars = 5000
Though these values will be scattered throughout the file. When you are done, save your file, and drag it back to the directory where your php.ini file is located and overwrite the existing file.
This is how it works for all themes on Themeforest and not only in our case.
5. Theme Update
For automatically update you need to use Envato WordPress Toolkit plugin. If you install this plugin then you will see the bellow option on your WordPress dashboard.
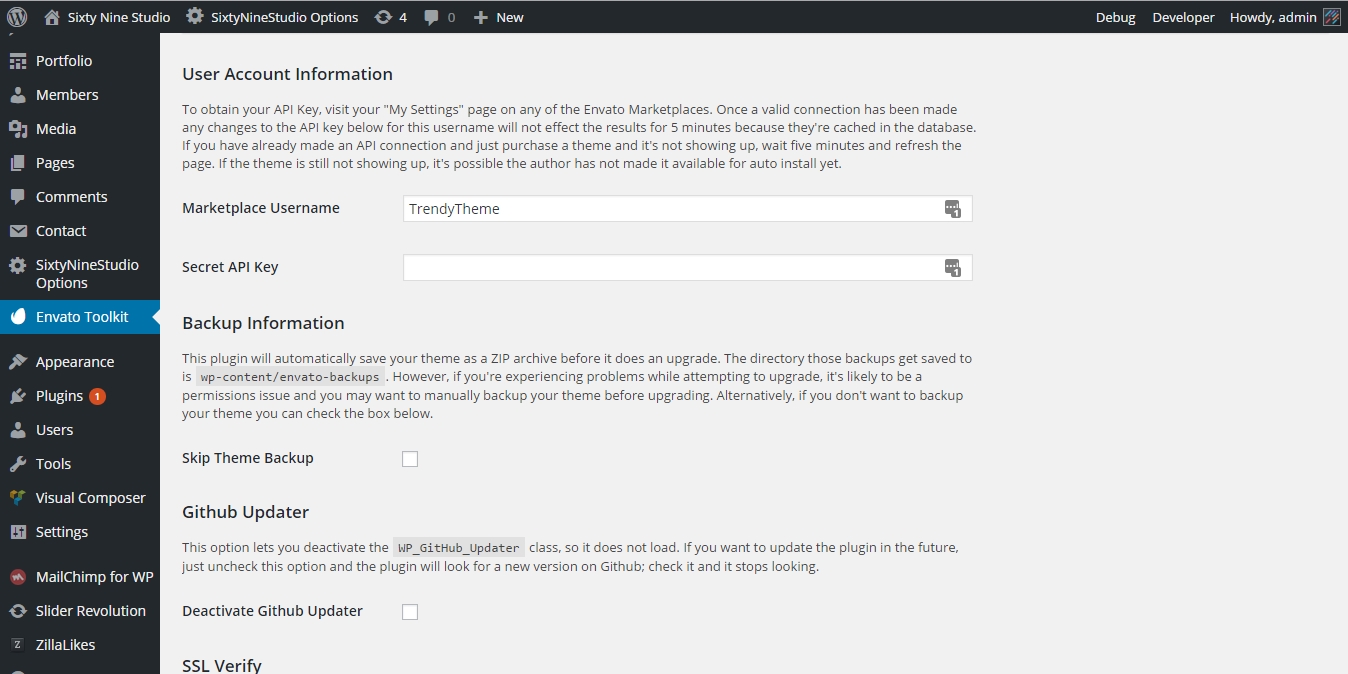
You need to provide some info like Envato username and Secret API Key. To get details instruction watch this video.
Updating Manually
- Download the most current installable WordPress version from ThemeForest in the "Downloads" area of your account.
- Go to Appearance > Themes and activate another theme such as the default WordPress theme.
- Delete the TrendyMag theme which is now inactive.
- Go to Install Themes > Upload then install and activate TrendyMag from the new package.
6. Language Translations
- Open wp-config.php and replace this:
define ('WPLANG', '');with this (subsitute the language string (bg_BG) with your own!):define ('WPLANG', 'bg_BG'); - Download and install POEDIT
- Go to theme directory > languages directory then you will see trendymag.pot, open it with POEDIT.
- Translate the file and save it as bg_BG (the file name must match with the string you inserted into wp-config.php)
- Two files will be generated after save. bg_BG.po and bg_BG.mo
- Upload the .mo and .po files into wp-content/themes/your-theme/languages folder
7. Basic Setup
After installing theme, plugin and importing all demo content you need to make basic setup.
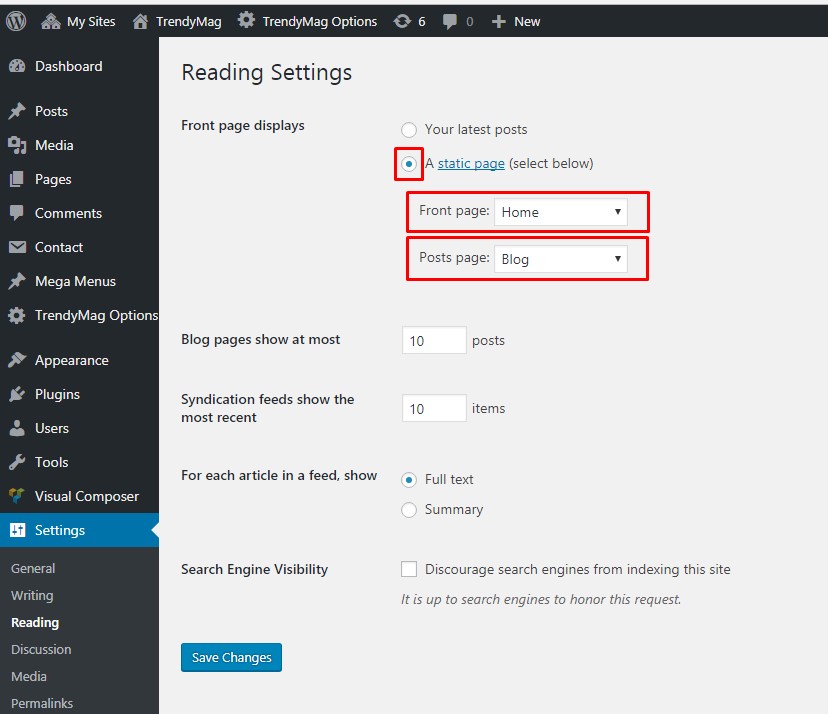
Front page and post page setup:
Go to the Settings > Reading menu in your WordPress Dashbord and select A Static Page at the Front page displays setting. Choose your own Homepage or one of the Home layouts that imported with the demo content and a Blog page there:
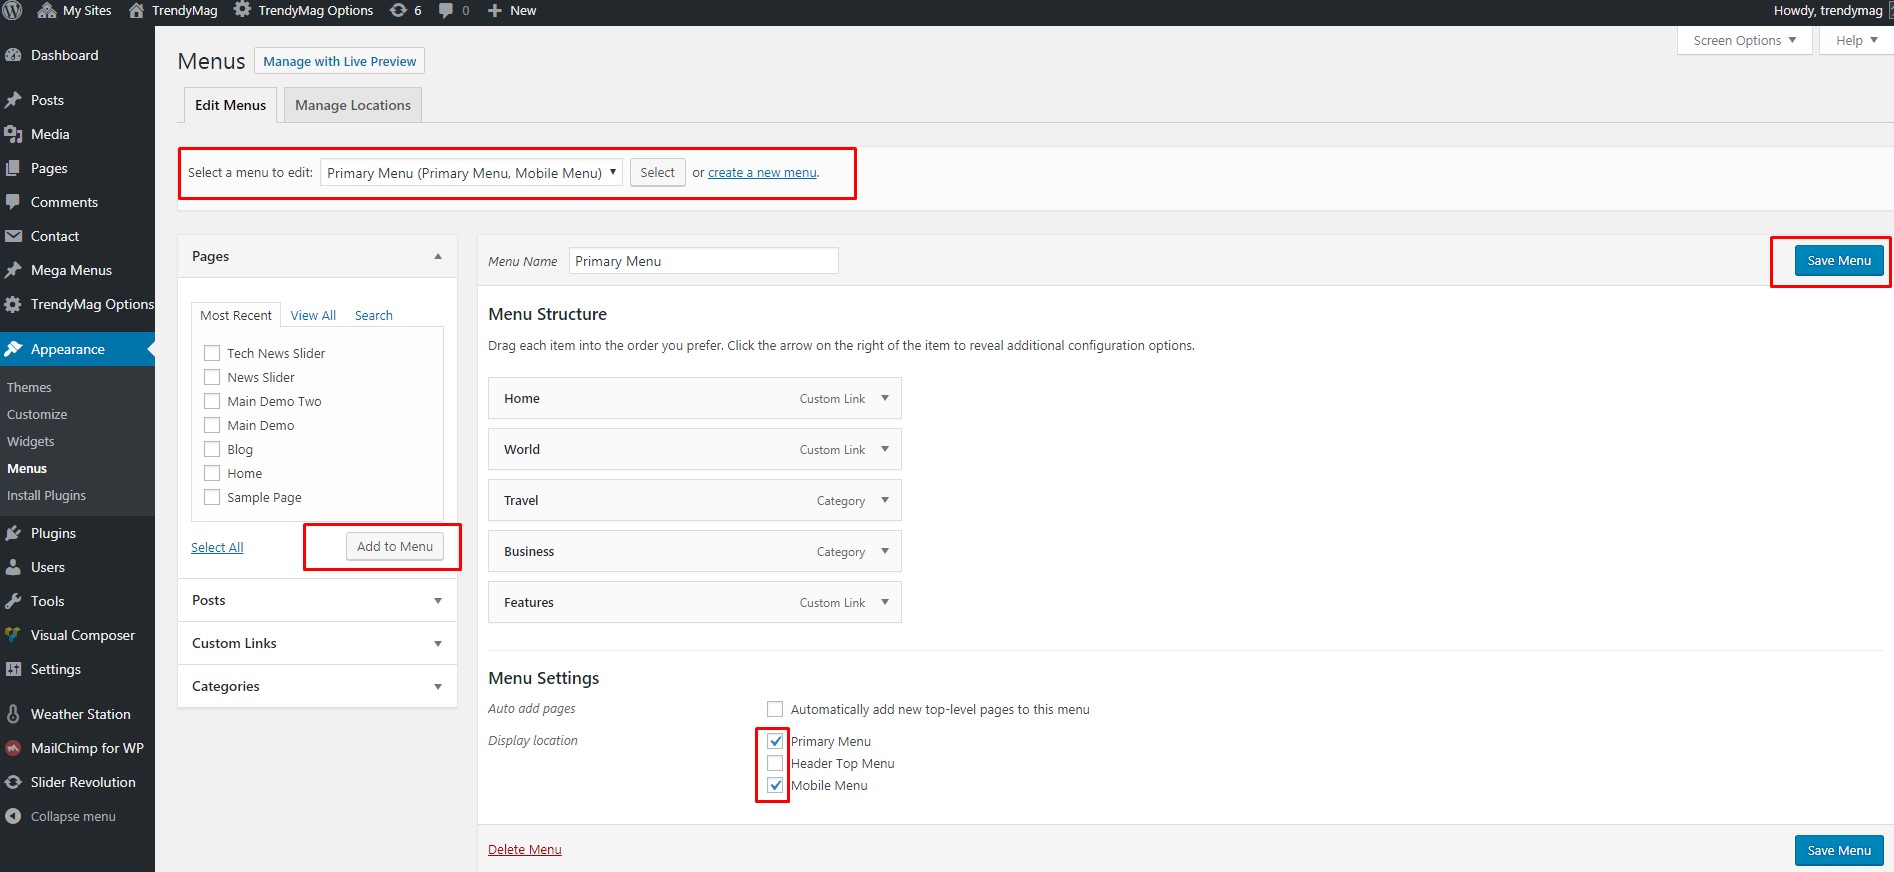
Menu Setup:
1. Go to the Appearance > Menus menu in your WordPress Dashbord and select Manage Location tab.
2. Select Primary Menu that imported with the demo content.
3. After selectin primary menu then go back Menu Edit and select Primary Menu checkbox located in the Theme Location on the bottom.
4. Save Menu.
8. Plugin Installation
After activating the theme, you will see a Required Plugins notice located on top. You have to install all required and recommended plugin to be fully operational.
9. One Click Demo Import
Before you begin, make sure all the required plugins are activated and php configuration limits to a minimum as follows:
max_execution_time=300, max_input_time=600, max_input_vars=5000, memory_limit=256M, post_max_size=48M, upload_max_filesize=48M.
You can verify your PHP configuration limits by installing a simple plugin found here. In addition, you can always contact your host and ask them what the current settings are and have them adjust them if needed
Importing demo data (post, pages, images, theme settings, widget data, contact form and newsletter) is the easiest way to setup your theme. It will allow you to quickly edit everything instead of creating content from scratch.
When you import the data, the following things might happen:
- No existing posts, pages, categories, images, custom post types or any other data will be deleted or modified.
- Posts, pages, images, widgets, menus and other theme settings will get imported.
- Setup up front page and Navigation will be selected automatically
- Please click on the Import button only once and wait, it can take a couple of minutes.
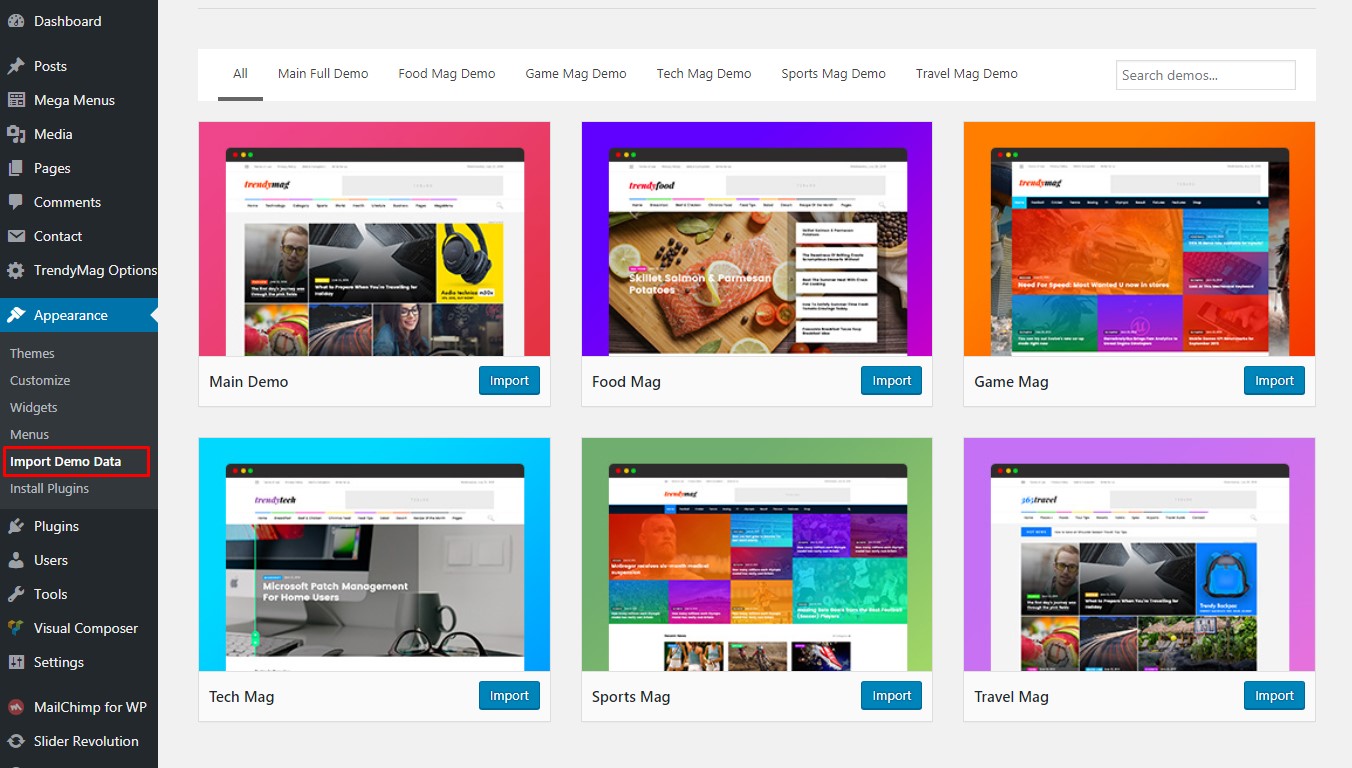
- Go to the Appearance from dashboard > then click Import Demo Data.
- Scroll down a bit and choose the demo import that will be install in your website.
- After deciding which demo you want to install, then click the "Import" button.
- Wait 5 – 7 minutes for the installation to finish. Some sites might take longer, but it all depends on the speed of your server and your download speed.
- After you have done to import demo content then go to Appearance > Import Sliders > then click Import Slider button to import slider demo data.
- Then visit your site
Manual Import Demo Content
Importing Widget Data:
1. Go to Plugins > Add New menu in your WordPress Dashboard.
2. Type Widget Importer & Exporter on the Search Plugin box and hit enter then you will see the Widget Importer & Exporter plugin install and activate then plugin.

3. Then you will see Widget Importer & Exporter option and click.
4. Choose the widget-data.wie (it can be found in your downloaded folder > Demo Content) and press Import Widgets.
Importing Theme Option:
1. Go to TrendyMag Options menu in your WordPress Dashboard.
2. Select Import/Export located in the bottom
3. Click Import from file and past theme-option.json code into there. (theme-option.json code can be found downloaded folder > Demo Content > theme-option.json, open it with editor and copy all code and past into import from file box on theme option)
4. Finally, click Import, it takes few second to import.
10. Theme Options
Theme Options Panel is a place where you can control every aspect of your website with few button clicks. It is accessible from the "TrendyMag Options" menu in your WordPress Dashboard:
Each available option there is well described so you shouldn't have any problems with any of them.
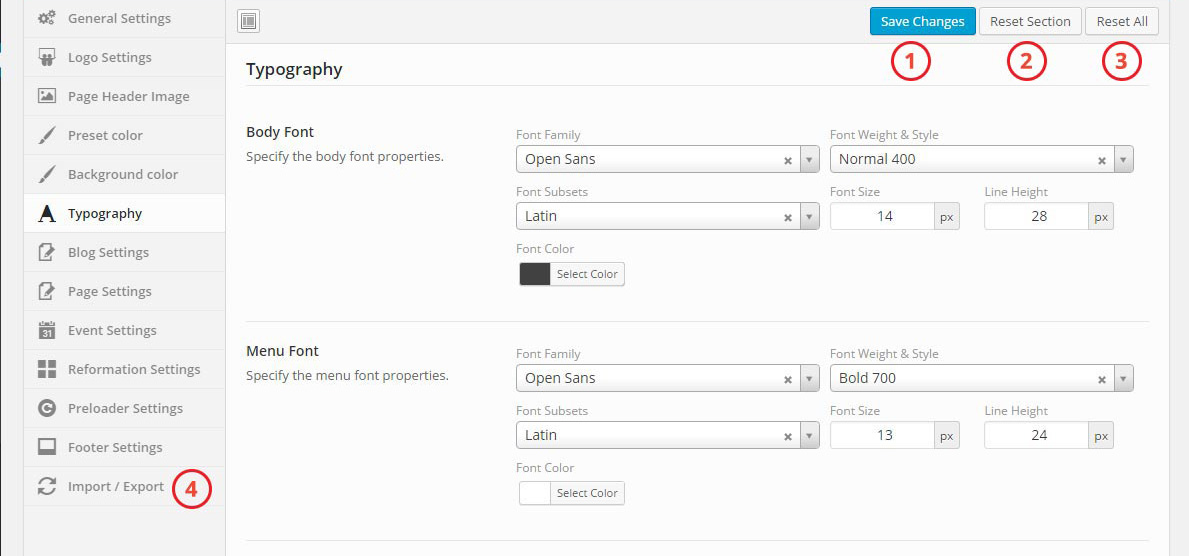
1. Saving Changes:
After you have made some changes in the panel, please don't forget to click the "Save Changes" button located both in the bottom and top section of the panel.
2. Reset Section:
If you like to make selected section is default then you can use this section.
3. Reset All:
To reset all custom settings of TrendyMag option then you can use reset all option.
4. Import / Export:
If you want to backup your TrendyMag option then you can use this tab. Just visit the "Import/Export" tab and follow the instructions. You can copy/download your current option settings. Keep this safe as you can use it as a backup.
After you download data file you can then load it anytime later or on a different site location (while migrating servers and so on).
11. Options Details
- General Settings: In the general settings menu, you can change page Breadcrumbs and Smooth Page Scroll. Quick View
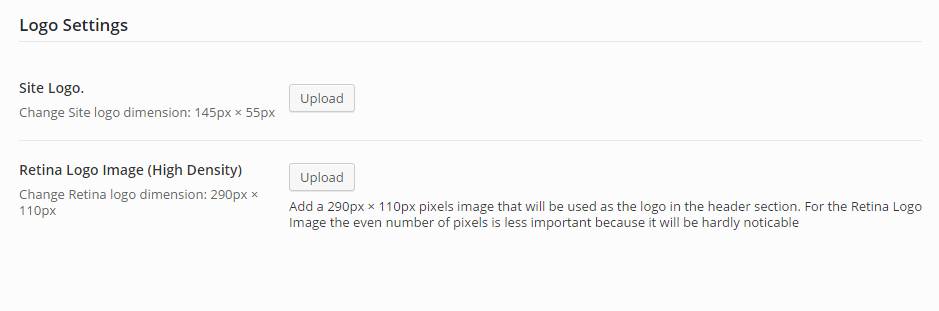
- Logo Settings: From this logo settings, you can setup Normal and Retina screens logo. Quick View
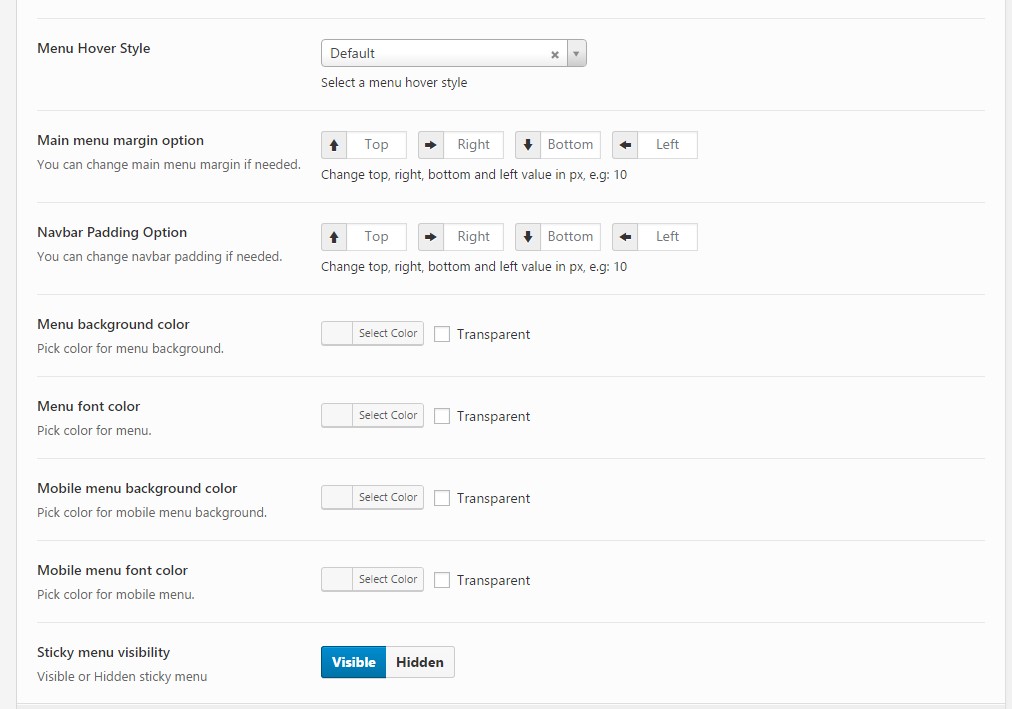
- Header Settings: In the Header settings, you can manage Menu Hover Style, Main menu margin option, Navbar padding option, Menu background color, Menu font color, Mobile menu background color, Mobile menu font color and Sticky menu visibility. Quick View
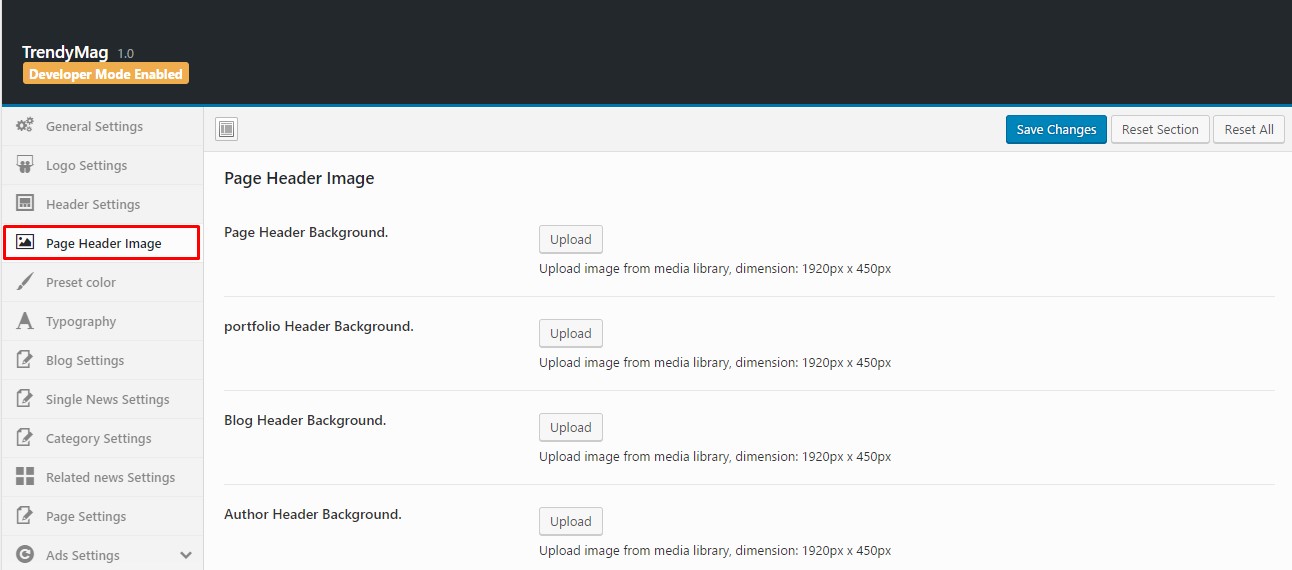
- Page Header Image: In the Page Header Image section, you can manage Page header background, Portfolio header background, Blog header background, Author header background. Quick View
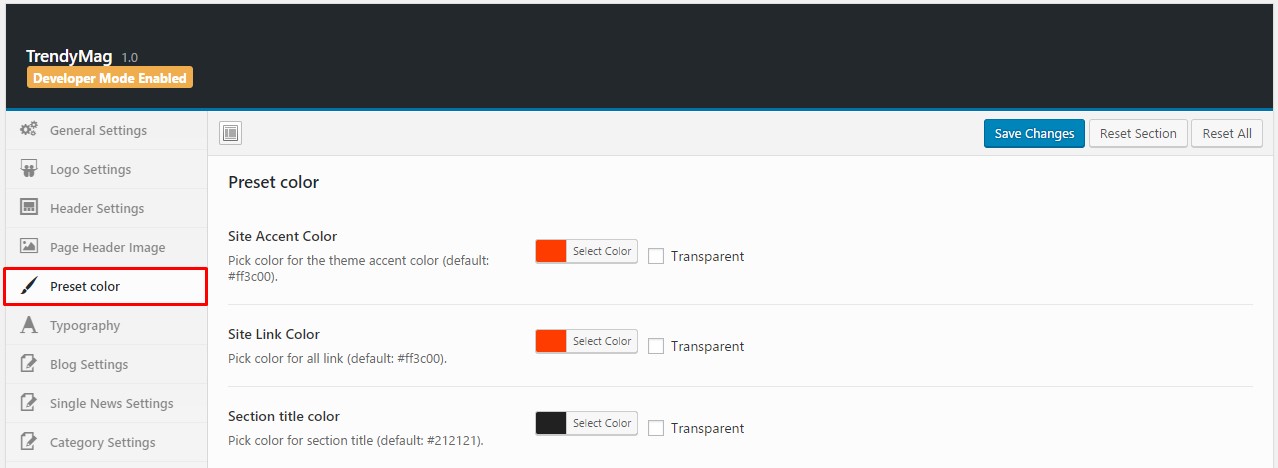
- Preset Color: In the Preset color, you can manage Site accent color, Site link color, Section title color. Quick View
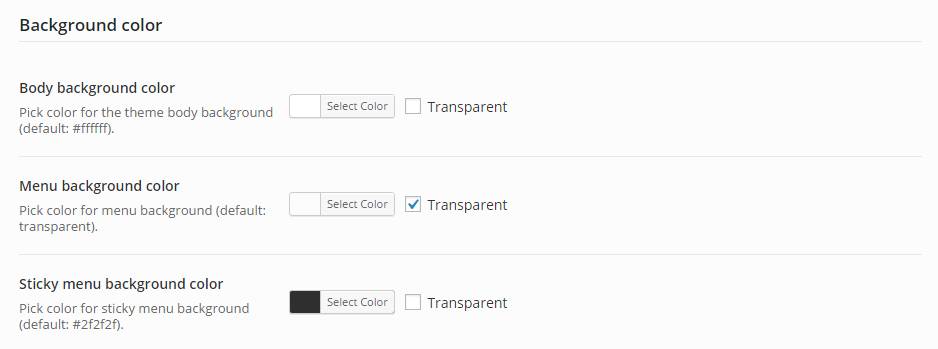
- Background Color: In this menu section, you can change some basic background color as like, Body background color, Menu background color, Sticky menu background color. Quick View
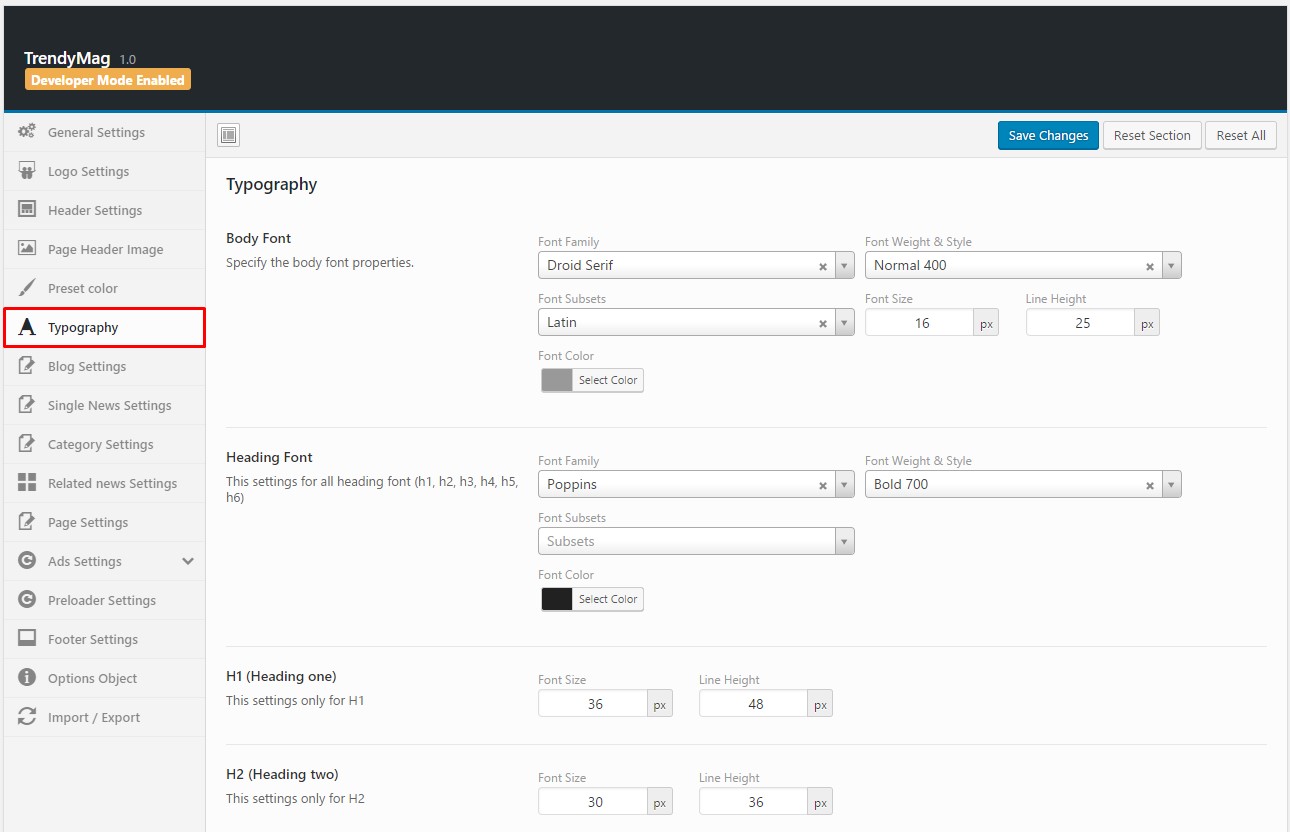
- Typography: In typography section, you can change almost all typeface, font-family, font-size, font-weight and line height of your website's text. In specifically you can change Body Font, Menu Font, Heading Font and all heading font sizes and line-height. Quick View
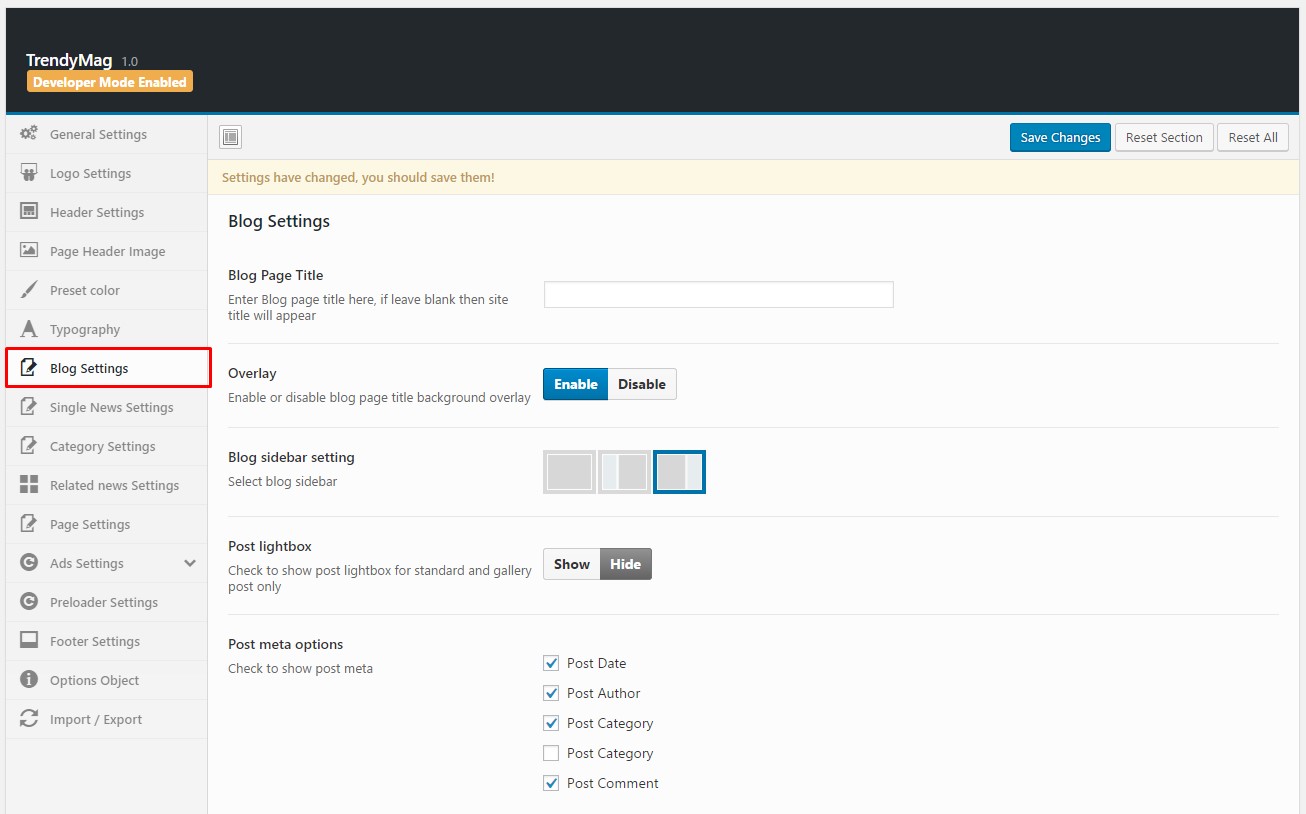
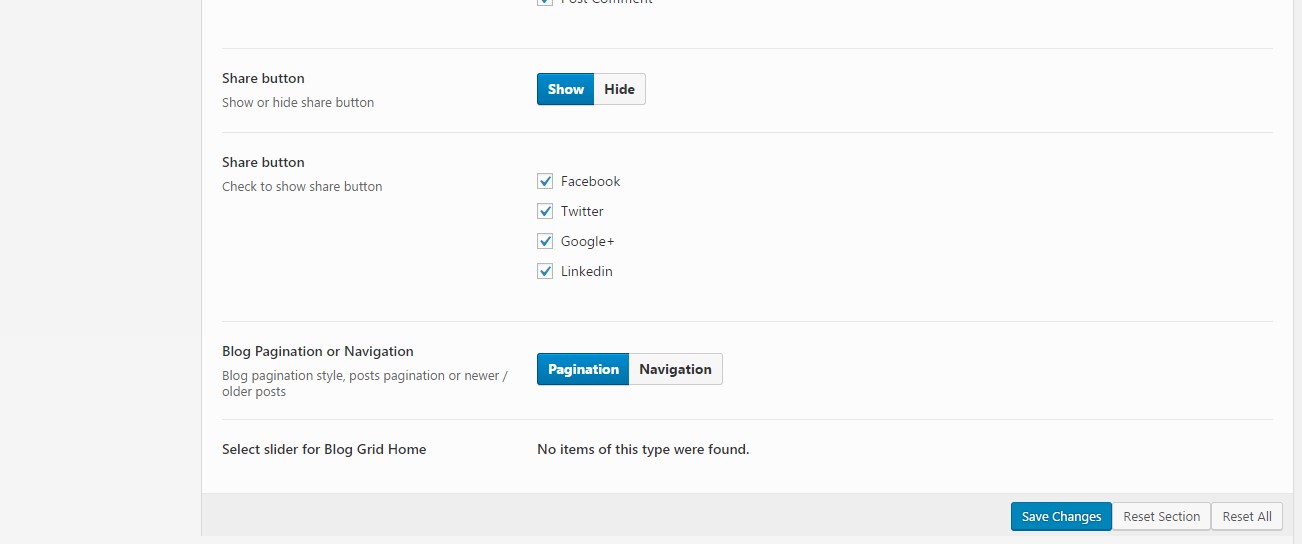
- Blog Settings: From this Blog Settings, you can control, Blog page title, Blog sidebar setting, Post meta options, Share button, Blog pagination or Navigation and Facebook comment. Quick View
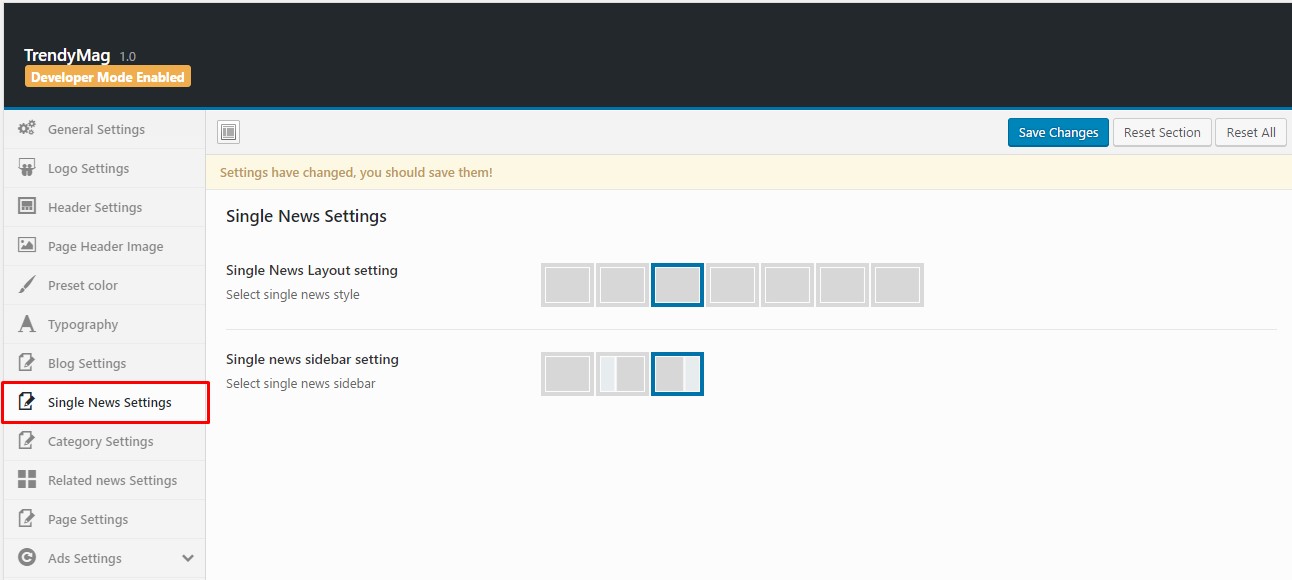
- Single News Settings: In this section, you can manage Single news layout setting and Single news sidebar setting. Quick View
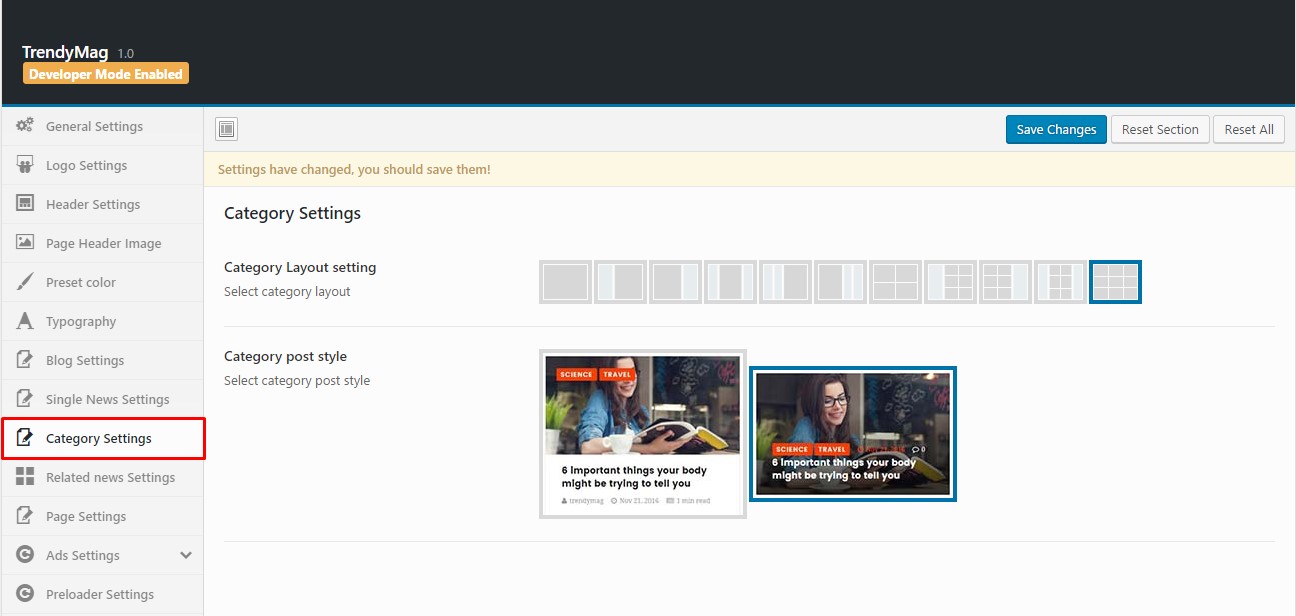
- Category Settings: In the Category Settings, you can control Category layout setting and Category post style. Quick View
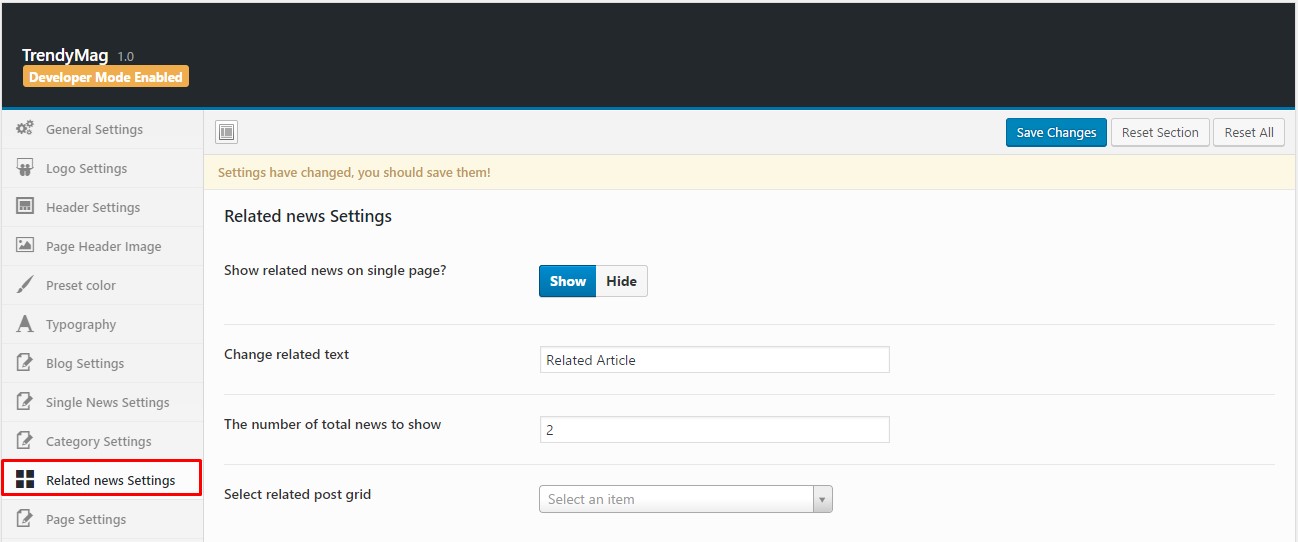
- Related News Settings: In this Settings, you can manage Show related news on single page, Change related text, The number of total news to show and Select related post grid. Quick View
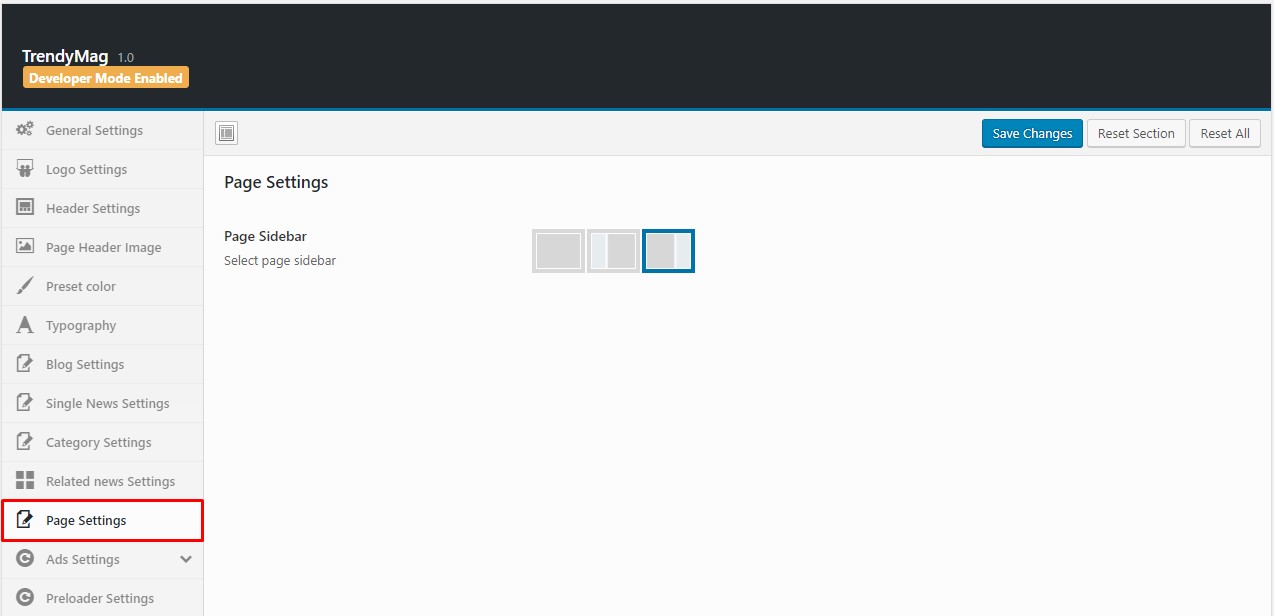
- Page Settings: In the page settings menu, you can change page layout style. You can choose a page with "left sidebar" or with "right sidebar" or without any sidebr. Quick View
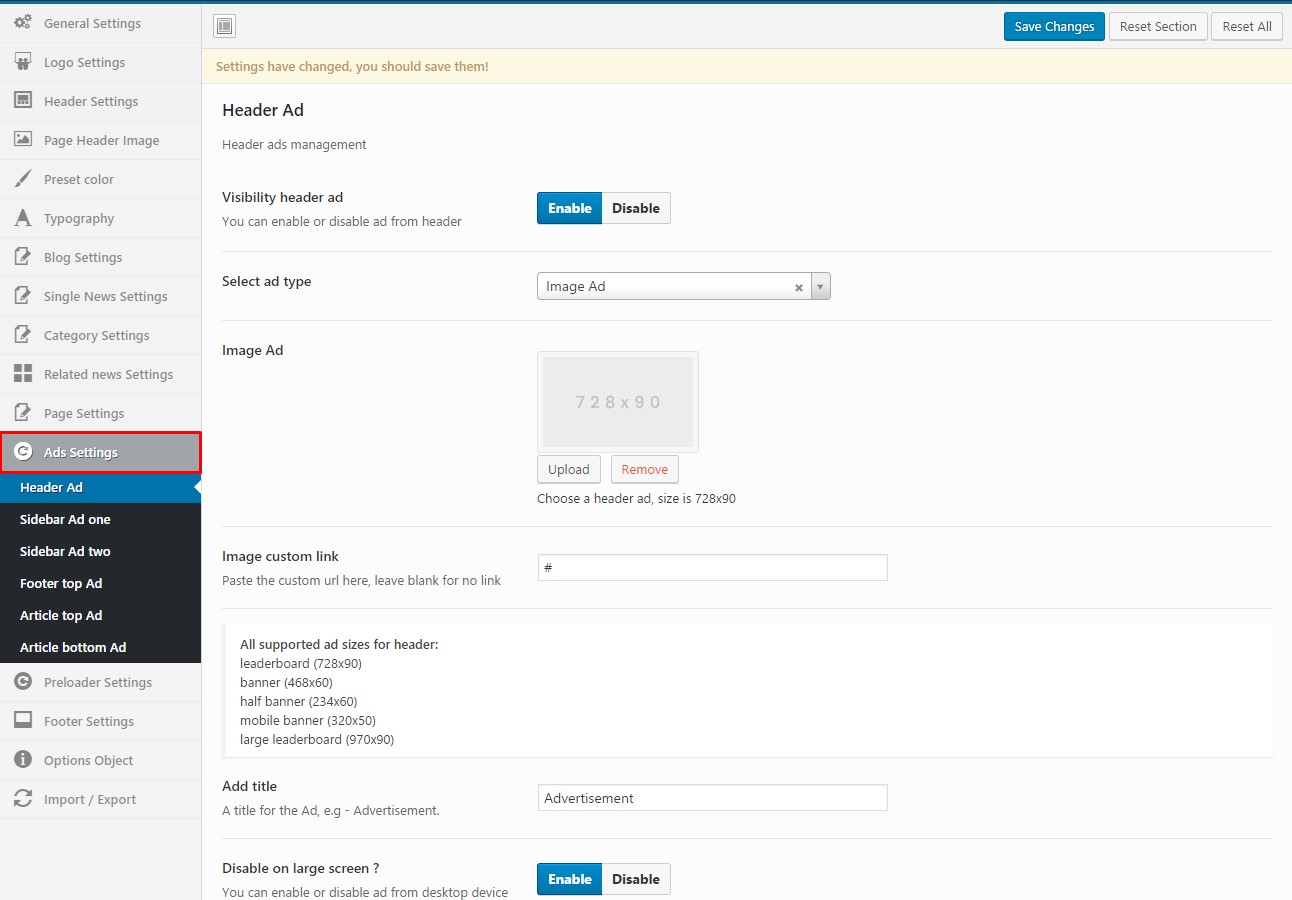
- Ads Settings: From this Ads settings menu, you can setup Header Ad, Sidebar Ad one, Sidebar Ad two, Footer Top Ad, Article Top Ad and Article Bottom Ad. Under all Add titles has some sub sections such as, Visibility header ad, Select ad type, Image ad, Image custom link, Ad title and Disable on large screenQuick View
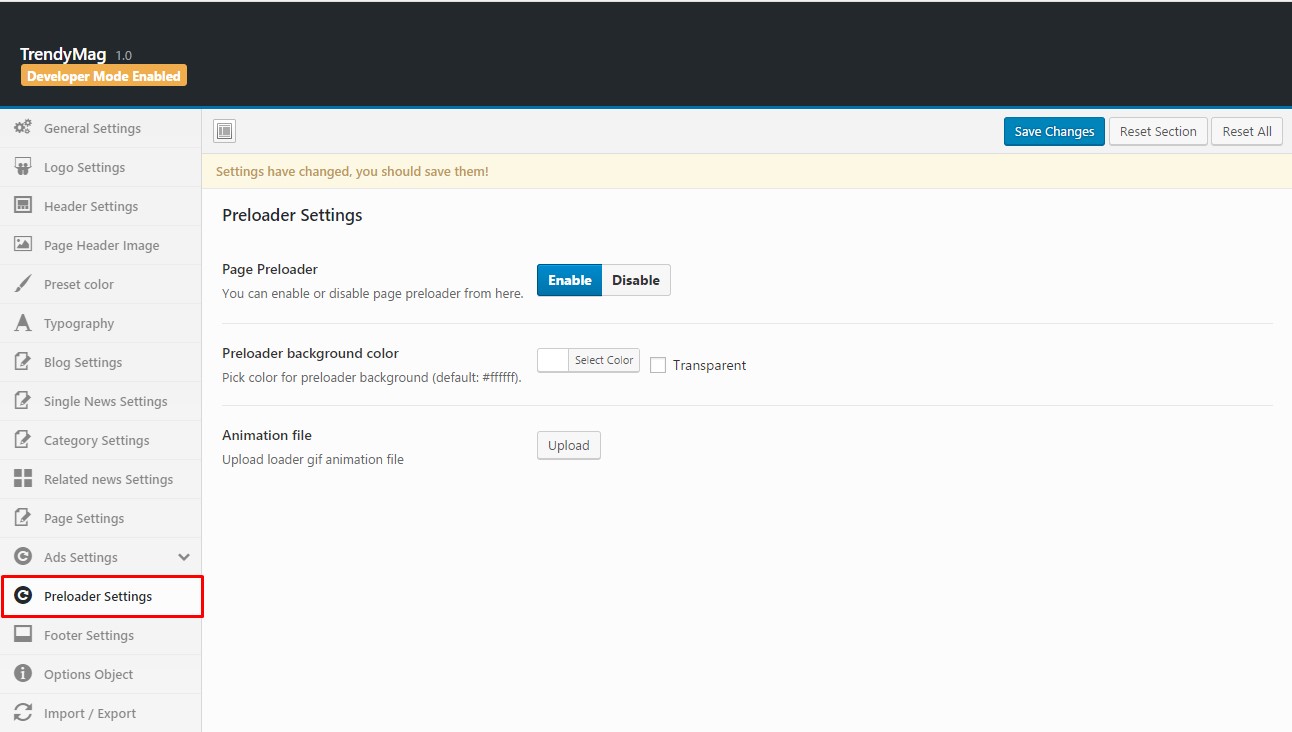
- Preloader Settings: By this Preloader Settings menu, You can enable or disable page preloader from here and also manage preloader background color and Animate file. Quick View
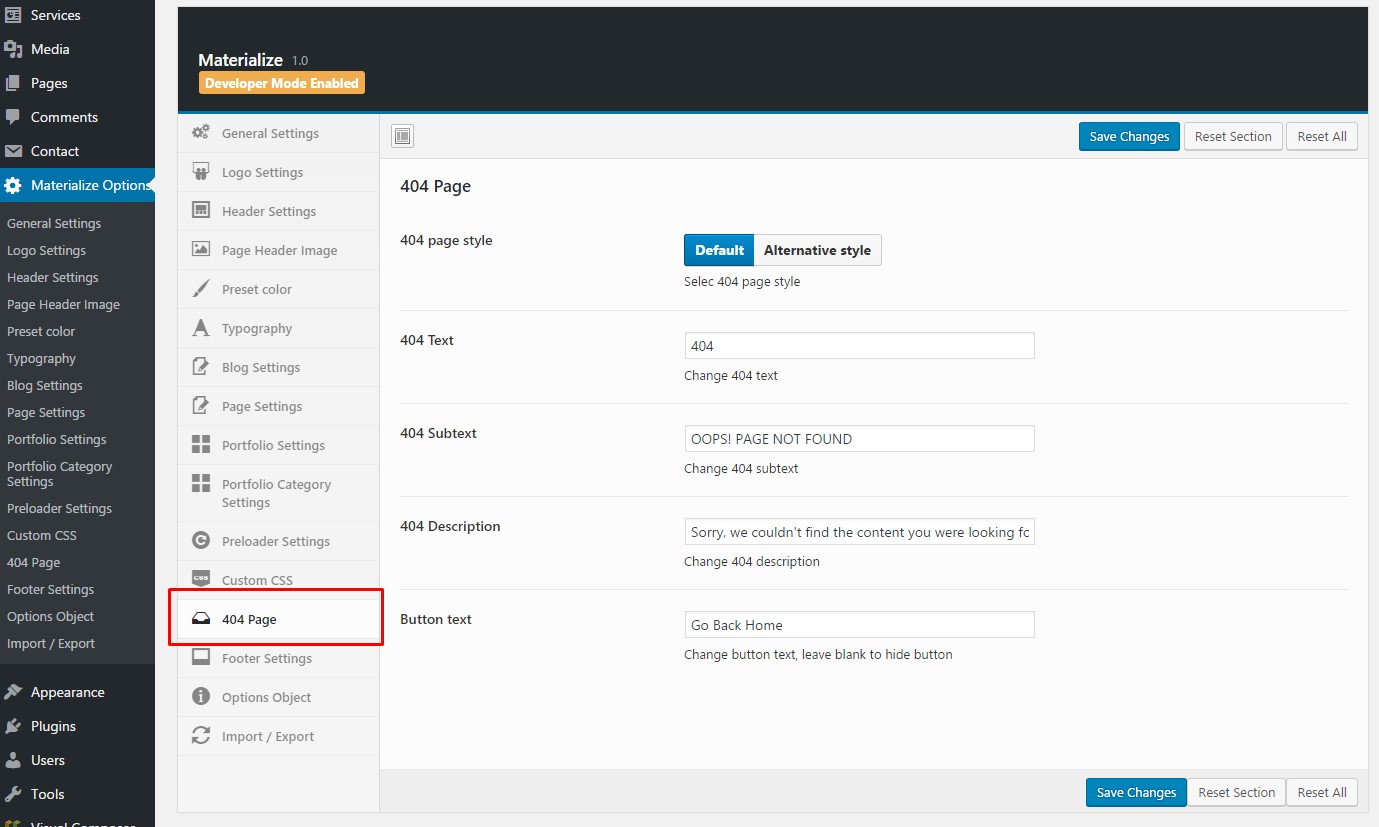
- 404 Page: In this menu sections, You can manage 404 page style, 404 text, 404 subtext, 404 Description and Button text. Quick View
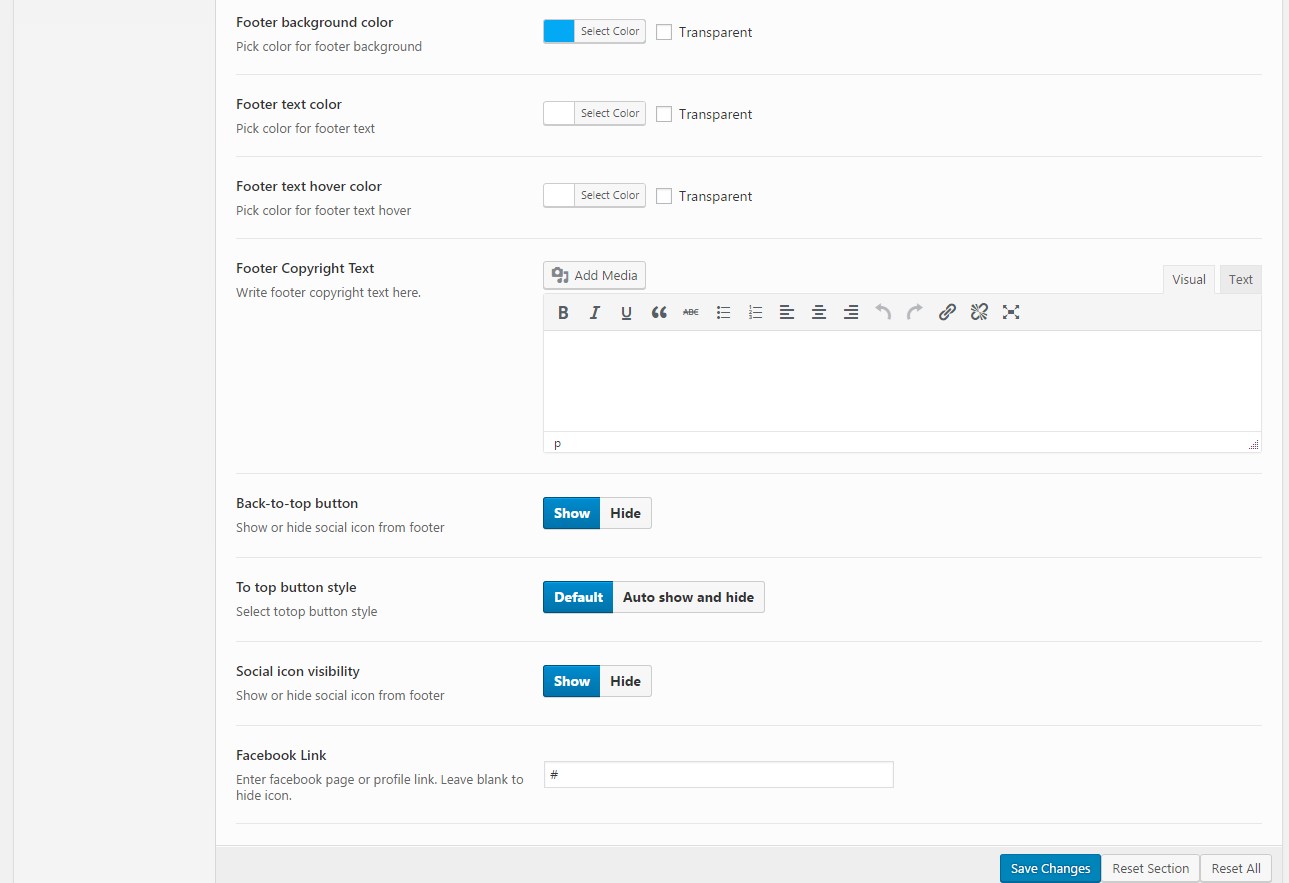
- Footer Settings: In this Footer Settings menu, You can manage Footer background color, Footer text color, Footer text hover color, Footer copyright text, Back to top bottom, To top button style and Social icon visibility. Quick View
- Import/Export: In this Sections, You can manage Import options and Export options. Quick View
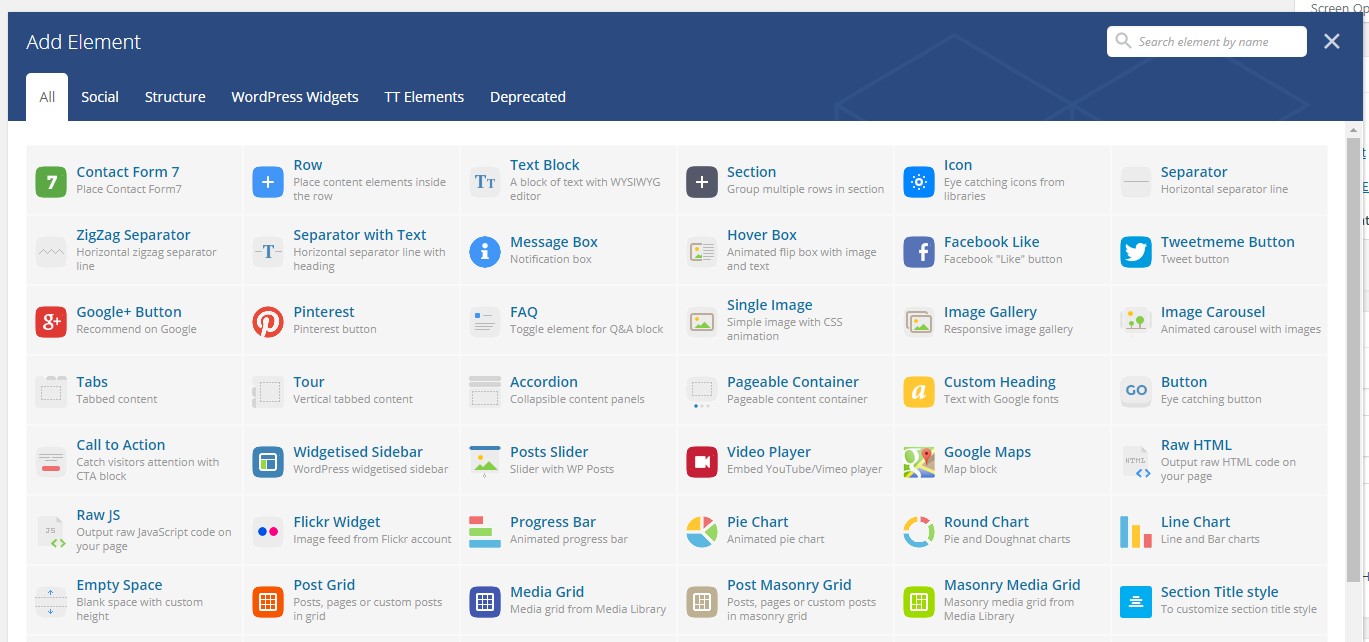
Creating Pages and Content
Creating your own page has been never so easy. This section covers information about the page and content creating process.
General Information: There are two ways of creating pages and posts content in TrendyMag theme:
A. With page builder
B. Classic Way
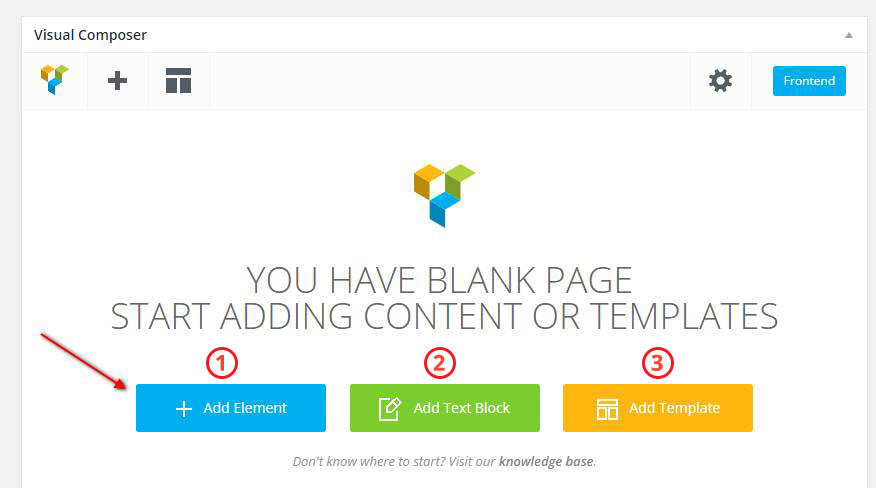
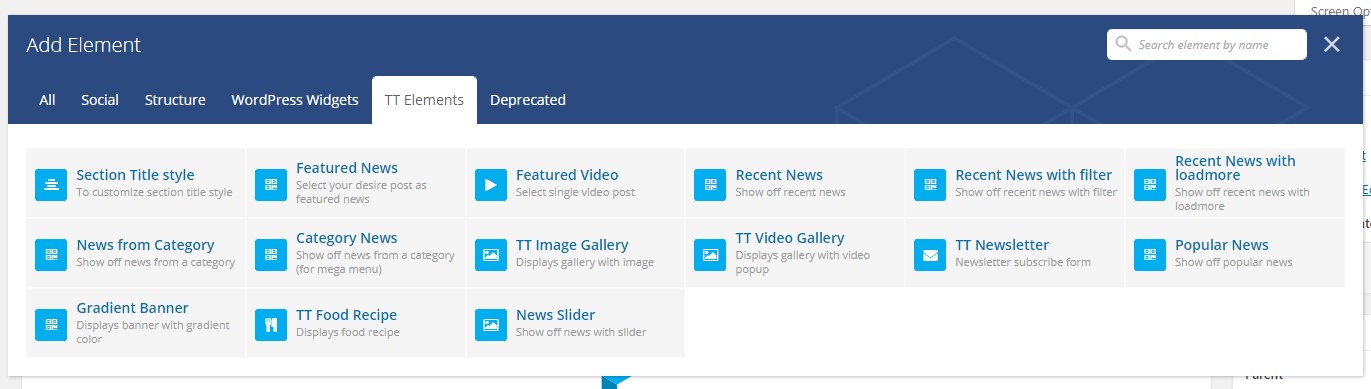
3. Add Template: If you wish to start with our default pre-defined template then select this option. If you select this option you will see all TrendyMag's Selection and page template. You can use is just one click. More details here.
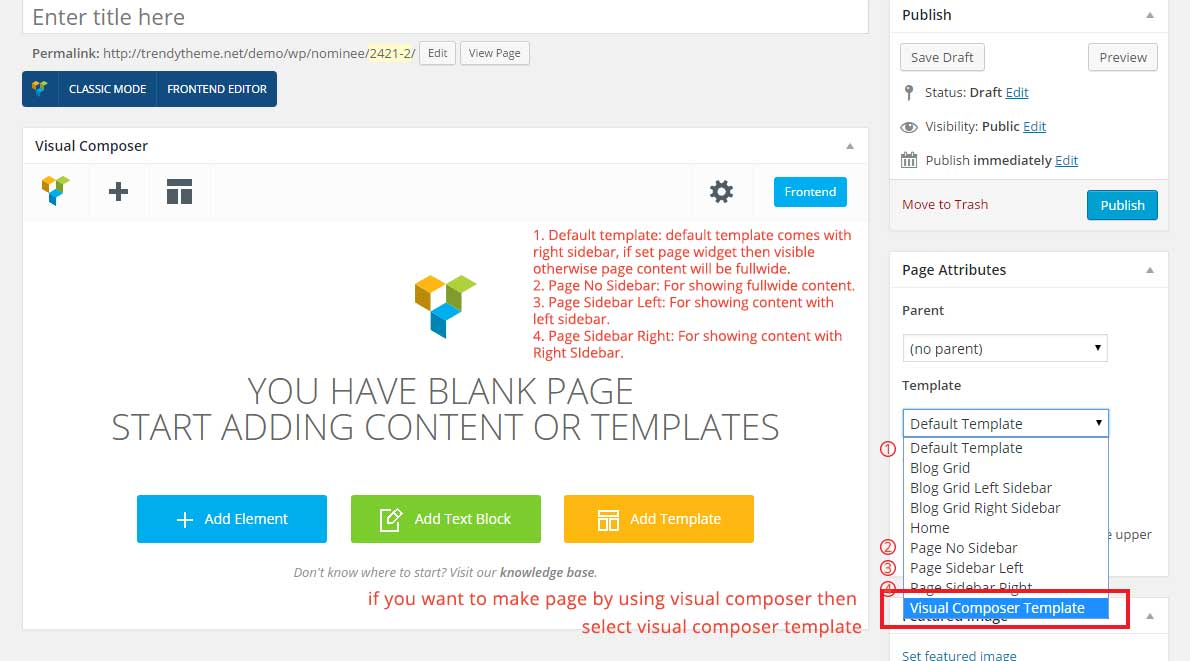
Page Settings
TrendyMag comes with a truly simple page settings management systems that lets you easily choose a page layout and each page and post individually.
Default Page Setting: You can change/setup all pages from Theme Options which will apply on all of the pages of this theme.
Individual Page Setting: By default all pages and it's all styles will inherits from Theme Options default settings. At the same time you can customize each of the page individualy from their bottom "Site Layout options" section.
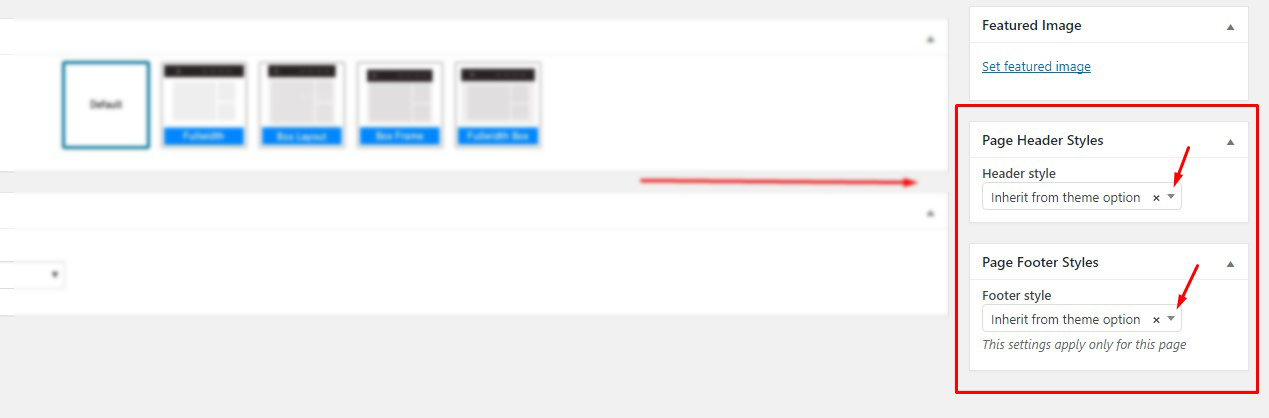
You can also Enable/Disable Page Header, change page header background image, change page title content alignment and can Show/hide breadcrumb from here.

From the page sidebar section you can also change Page Header Styles and footer styles
Menu Creation
Creating Homepage
In TrendyMag all Home page completely build with Visual Composer, you have to active visual composer plugin.
If you dot want to build a page from scratch, you may import the theme's demo content and you will get instant access to all of the homepages straight from the theme's live preview. If you would like to build one from scratch or simply learn the structure of it, please keep reading.
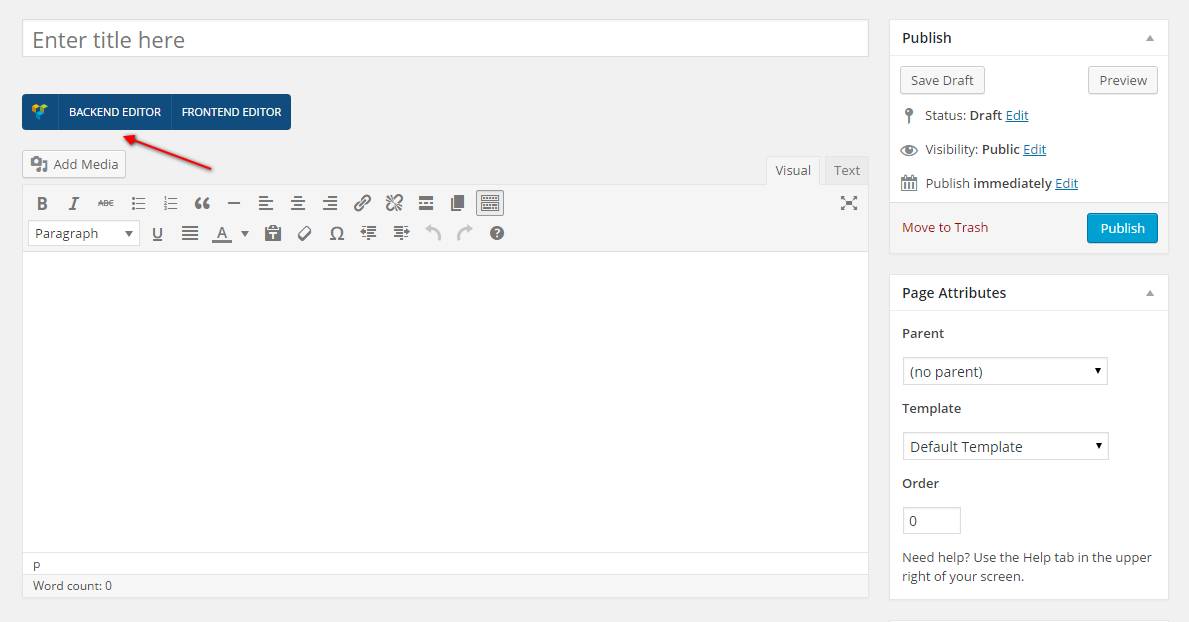
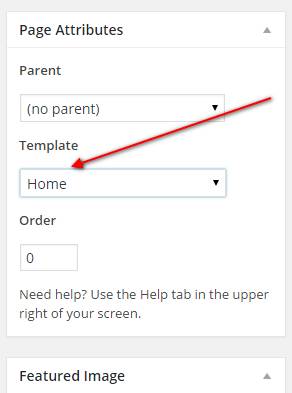
If you built a page from scratch then create "New Page" and Select page template "Home".
Next step is to enable the Visual Composer for the page by clicking the "Backend Editor"
Here is the video tutorial how to build your homepage:
Creating News Post
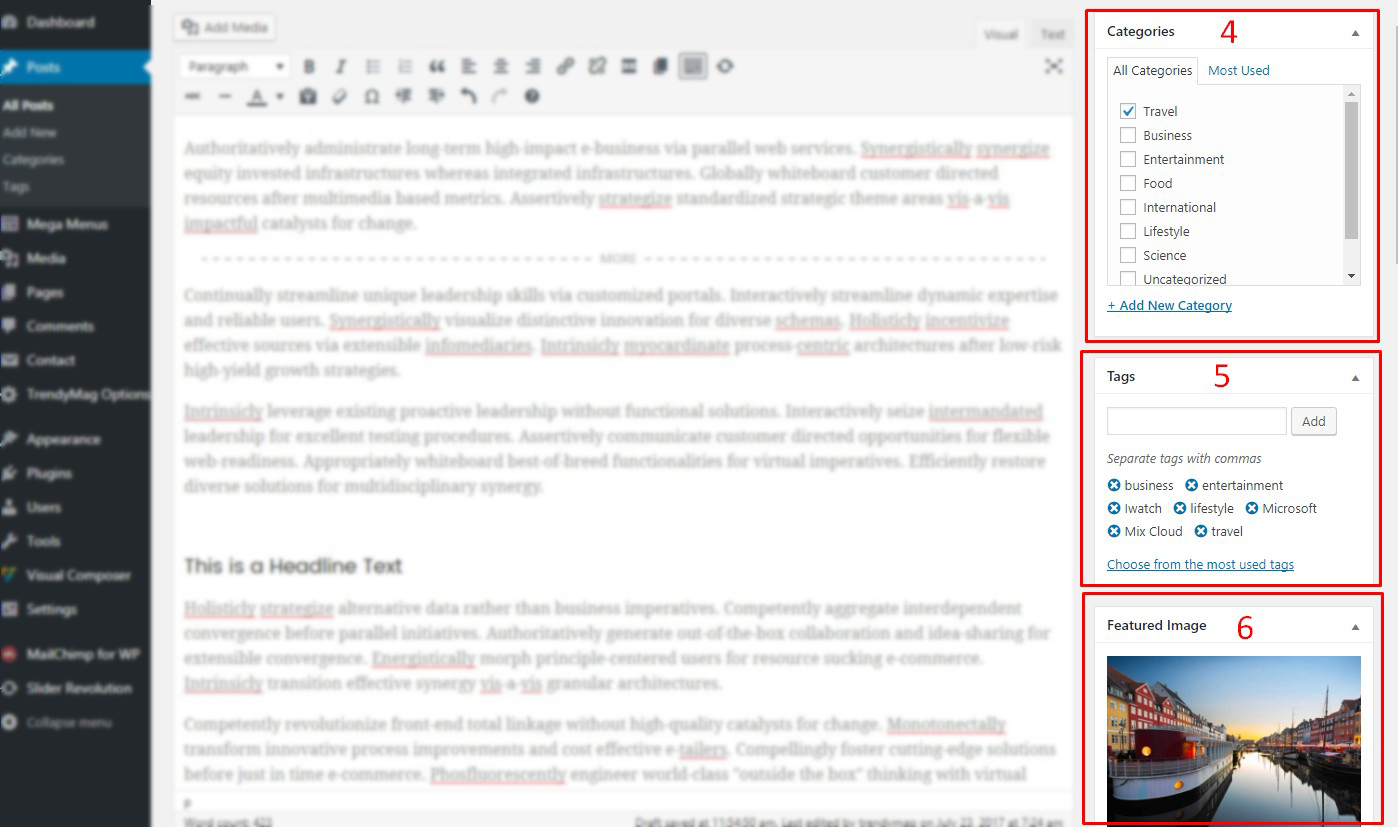
Here you will get idea about dashboard of News post.
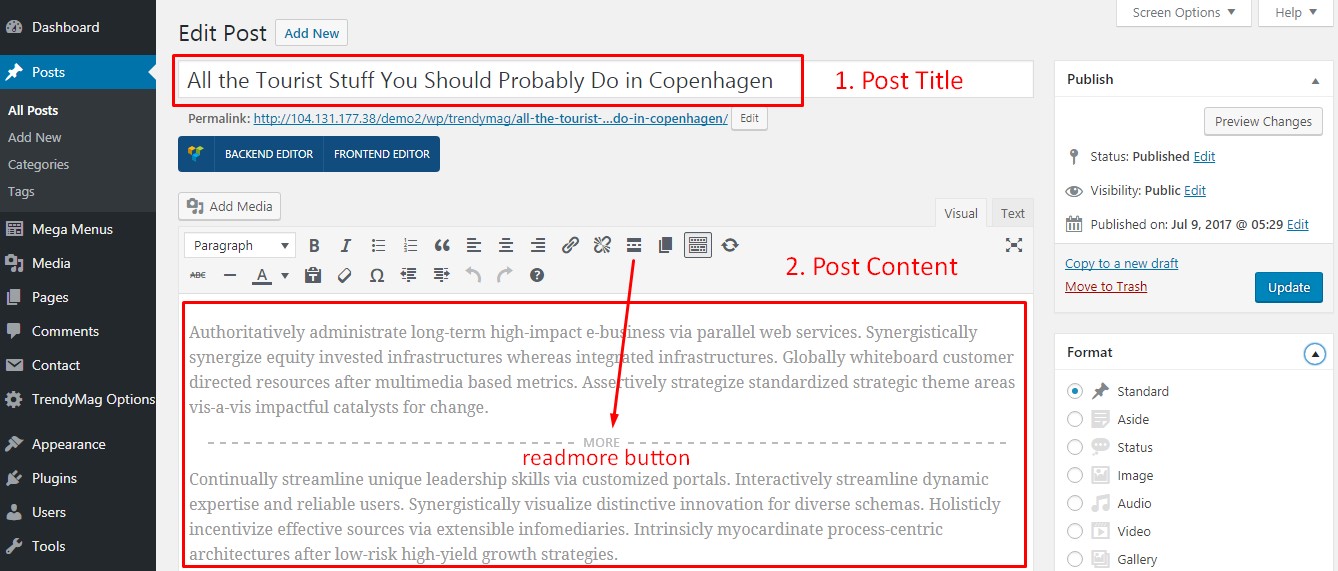
1. Add post title: Add your post title.
2. Post content: You can post any text content here also you can use visual composer. If you want to show "Read More" button then put cursor where you want to show "Read More" button then click "Insert Read More Tag" from the Editor then you will see the More Tag on the Editor.
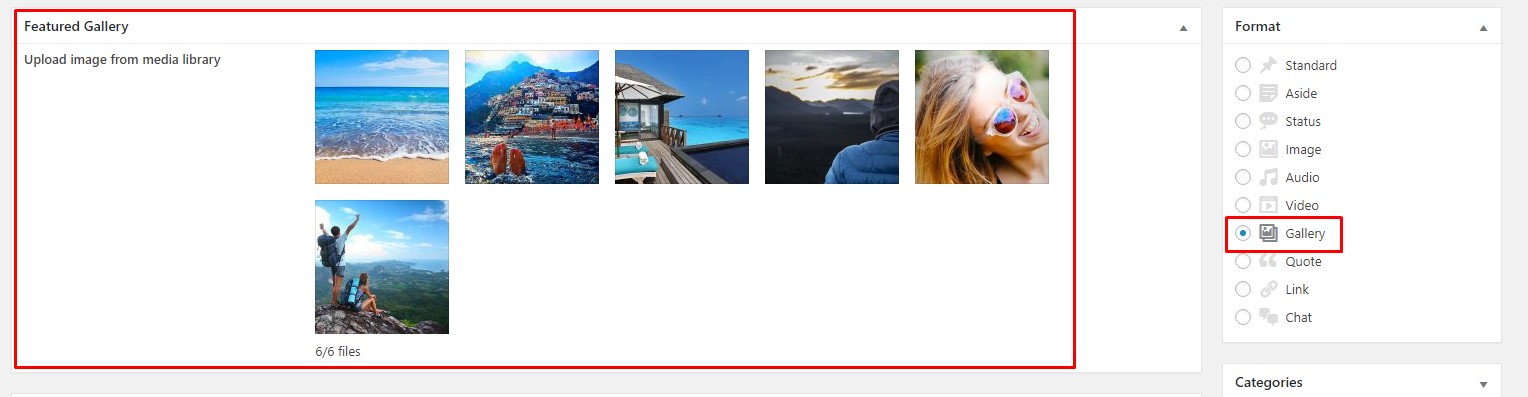
3. Post Format: You will get 10 post format from sidebar. Standard is default format. By default standard blog post is selected and if you select others post format as like gallery then you will see the extra option on bottom of the editor box.
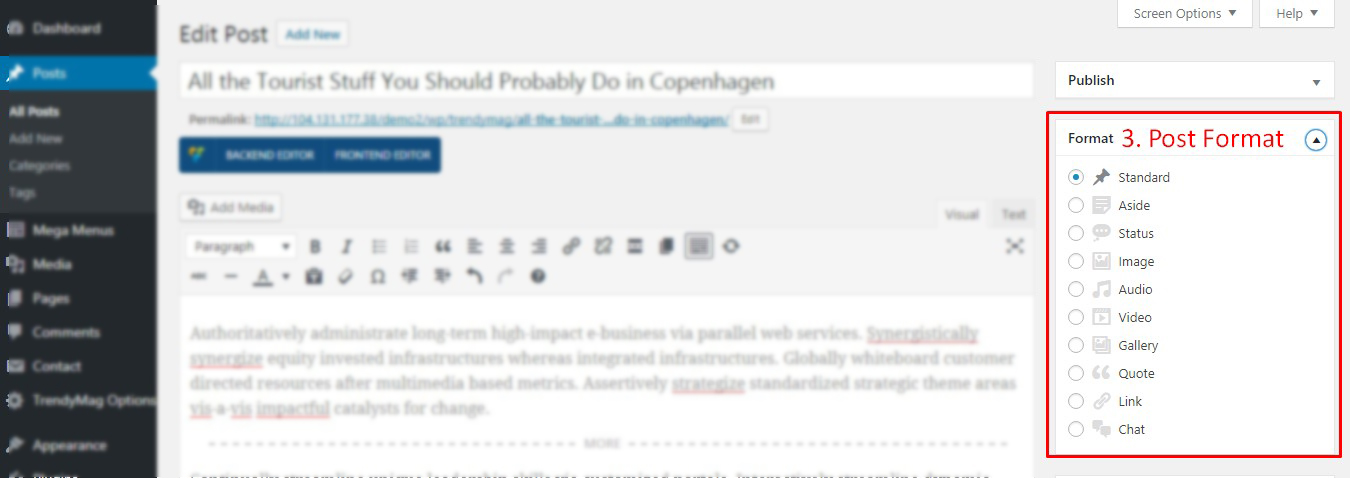
You can create gallery for the post and if you use meta option then you do not need to add featured image because gallery will show instead of featured image.
4. Category: You can select post category from there and if you want to create new category then use "Add New Category" option.
5. Tags: You can use post tag. If you wish to use previous tags then click "Choose from the most used tags" link and add new tags with comma (,) separator.
6. Featured Image: Add your Post thumbnail here.
Single News style: You can choose single news style from here.

Here is the video tutorial of how to creating a news post.
Plugins
TrendyMag comes with 6 required and 2 recommended plugins:
You must have installed all required plugin to get all features.
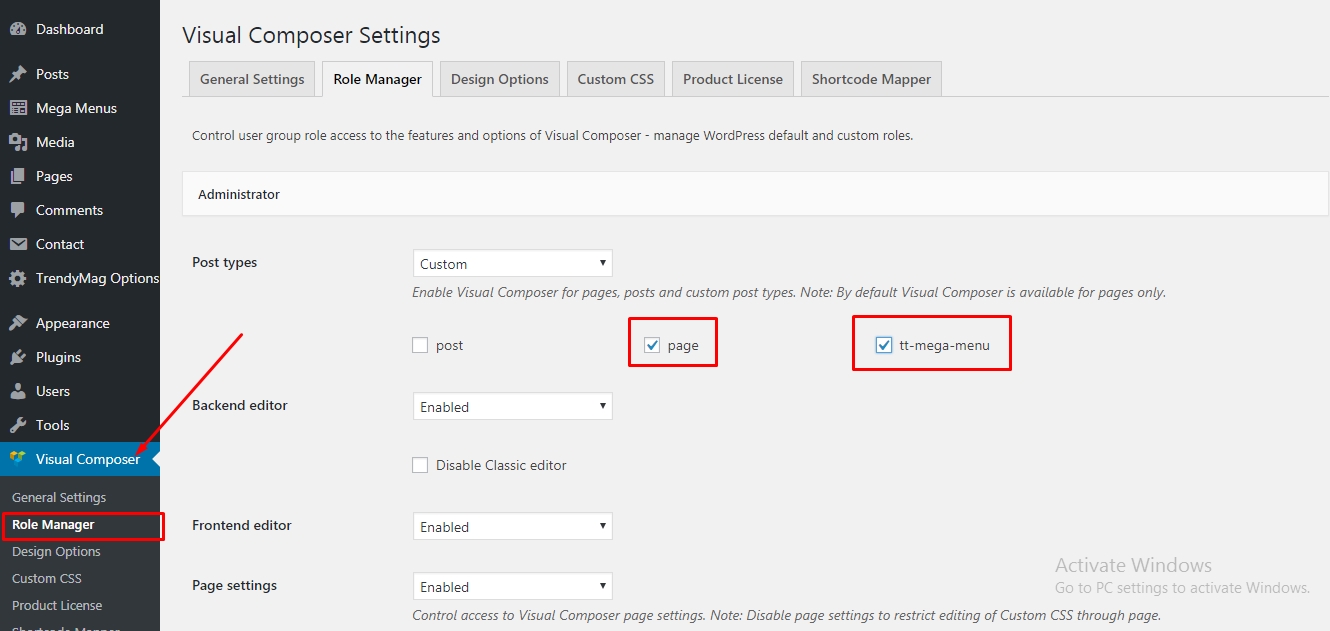
1. Visual composer: Use Visual Composer page builder you can take full control over your site. Build any layout you can imagine with intuitive drag and drop editor – no programming knowledge required.
Here you will find visual composer documentation.
In TrendyMag theme, you need to change some settings. Go to Visual Composer menu form your dashboard and navigate to Role Manager then select your desired post type. You can enable Visual Composer for pages, posts and custom post types. Note: By default Visual Composer is available for pages only.
2. Redux Framework: Redux is a simple, truly extensible options framework for WordPress themes and plugins. If you wish to customize/or extend TrendyMag theme then follow Redux Framework documentation here.
3. Trendy Theme Plugin: Trendy Theme plugins comes with many features: all post type, custom widget, meta options and much more. So, you must be installed the plugin. You do not need any documentation for this plugin just install and enjoy.
4. Meta Box: Meta Box plugin is a powerful, professional solution to create custom meta boxes and custom fields for WordPress websites.
Plugin documentation can be found here.
5. Contact Form 7: Contact Form 7 is powerful contact management plugin.
Plugin documentation can be found here.
6. MailChimp for WordPress, the absolute best. Subscribe your visitors from your WordPress site to your MailChimp lists, with ease.
If you wish to create new form or somehow missing form style then you can use following markup:
			<div class="form-group">
			  <input type="email" class="form-control" name="EMAIL" placeholder="Enter your email here" required="required">
			</div>
			<input type="submit" class="btn btn-primary" value="Subscribe">
Plugin documentation can be found here.
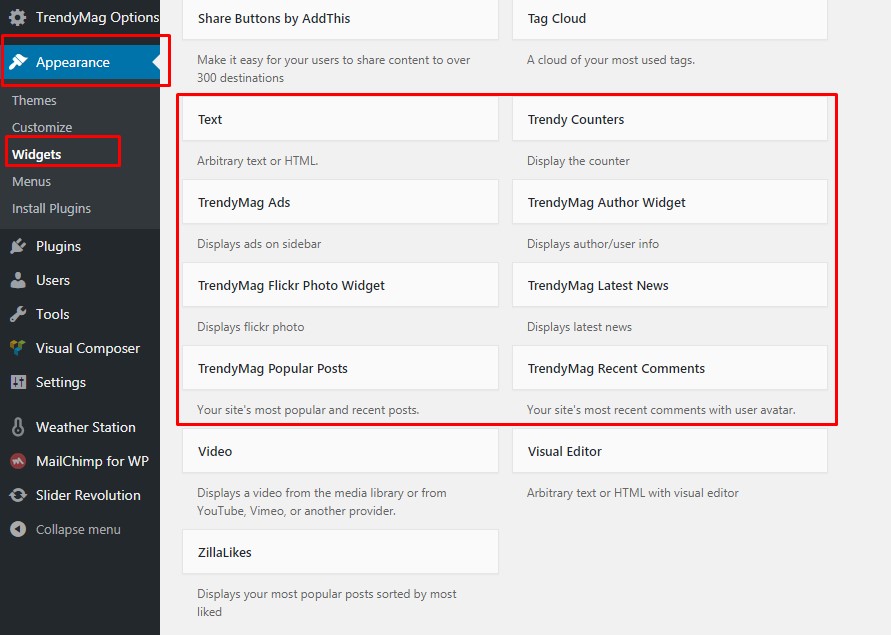
Widgets
We have included 7 custom widgets but in total you have 30+ different widgets to use. To get them, all you need to do is drag widgets available on left side and drop into right sidebars on the right side.
Customization
TrendyMag theme has lots of customization option. In TrendyMag Option you will find all customization option. You can customize theme typography from typography section:
and there is also have color change option. You can change theme accent and content color and also change theme background, menu background and sticky menu background color.
and you can also use theme hooks for advanced customization.
Theme Hooks
Action Hooks:
Filter Hooks:
Sources & Credits
HTML/CSS
- Twitter Bootstrap: http://getbootstrap.com/
- http://trendymagcss.com/
- Animate.css: http://daneden.github.io/animate.css/
Fonts + Icon
- Google Fonts: http://www.google.com/webfonts
- Font Awesome: http://fontawesome.io/
- Material Icon: https://material.io/icons/
JavaScripts
- jQuery: https://ajax.googleapis.com/ajax/libs/jquery/1.11.1/jquery.min.js
- jQuery Easing: http://gsgd.co.uk/sandbox/jquery/easing/
- Sticky: https://github.com/garand/sticky
- Smoothscroll: http://cferdinandi.github.io/smooth-scroll/
- CountTo: https://github.com/mhuggins/jquery-countTo
- Stellar: http://markdalgleish.com/projects/stellar.js/
- Shuffle: http://vestride.github.io/Shuffle/
- Inview: https://github.com/protonet/jquery.inview
- Owl.carousel: http://owlgraphic.com/owlcarousel/